這篇文章會用一個簡單的範例來說明 Graphwalker 的使用方法,並且會用到 Selenium 來驅動瀏覽器。
關於 Graphwalker
Graph Walker 是一個 Model Base Testing 的工具,它可以讓你用一個 Graph 的方式來描述你的測試案例,他提供一個 UI 介面讓你繪製 Model (以 Graph 的方式呈現),並且可以讓你用 Java 或是 C# 來撰寫測試程式。
範例
本篇將會介紹一個簡單的範例以及我痛苦的踩雷歷程來帶大家入門 Graph Walker,程式碼在我的 GitHub 上可以找到。
環境
- Windows 10
- Java JDK 19.0.2 (依照官網說法Java 8 以上都可以)
- Maven 3.9.0
- Graphwalker 4.3.0
- Selenium 4.8.0
關於 Java 和 Maven 的安裝可以參考我提供的連結,這邊就不再贅述。
Graphwalker 的安裝
Graphwalker 有兩個工具,一個是 Graphwalker Studio,一個是 Graphwalker CLI,要建模型的話這邊我們只會用到 Studio,所以我們就先安裝 Graphwalker Studio,後面會用到 Graphwalker CLI 的時候再來安裝。
按連結下載後,把它放到你想要的地方,接著打開命令提示字元,輸入以下指令來執行 Graphwalker Studio。
1
| java -jar graphwalker-studio-4.3.2.jar
|
或是直接對他點兩下也可以。
之後打開瀏覽器,輸入 http://localhost:9090/studio.html,就可以看到 Graphwalker Studio 的畫面了。
建立 Model
這邊 Graph Walker的官網文件就寫得蠻清楚的,可以直接參考他首頁的 gif 建立新的 Model 檔案。
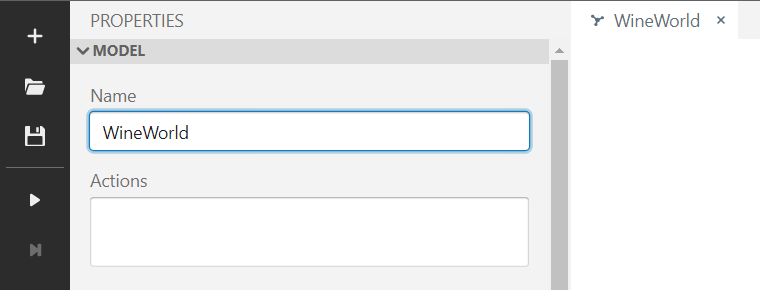
新建好空檔案後記得要改名稱。
模型有兩個元素
- v: Vertex,代表一個狀態或是頁面,是靜態的
- e: Edge,代表一個動作或事件,是動態的
在 Graphwalker Studio 中
- 按住鍵盤的 v 並點擊畫面,可以建立一個 Vertex
- 按住鍵盤的 e 並點擊起點 Vertex 後按住不放,拖曳到目標 Vertex,可以建立一個 Edge
除了使用 Graphwalker Studio 來建立模型,你也可以使用其他工具來建立,例如 yEd,他產出的 graphml 檔案也可以直接拿來使用。
我的模型
我的模型是用來測試我自己之前的 Side Project,是一個電商網站。我想要測試從首頁一路點擊到商品細節頁面的流程,所以我建立了以下的模型。
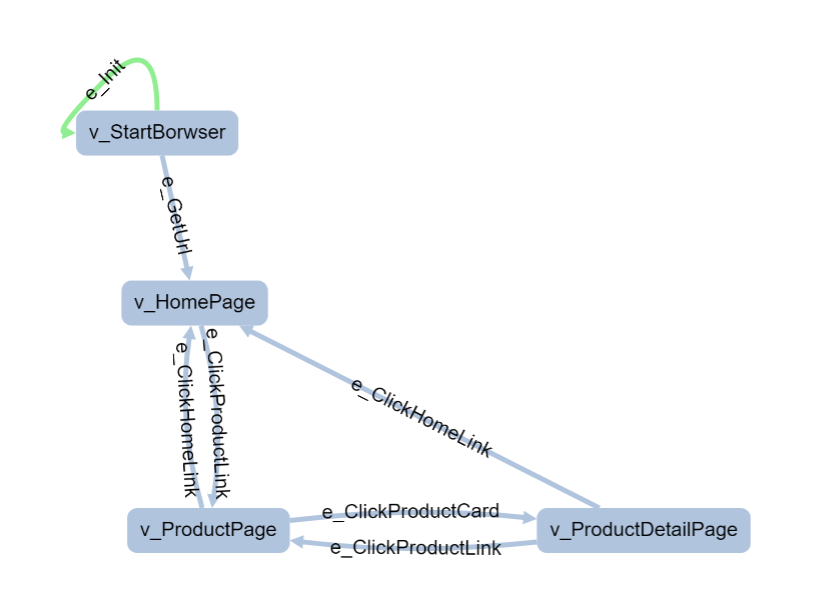
- e_init: 模型的起點,在左側設定欄下方 Start Element 可以打開這個設定
- v_StartBrowser: 啟動瀏覽器
- e_GetUrl: 進入首頁
- v_HomePage: 首頁
- e_ClickProductLink: 點擊商品列表連結
- e_ClickHomeLink: 點擊首頁連結
- v_ProductPage: 商品頁面
- e_ClickProductCard: 點擊商品卡片
- v_ProductDetailPage: 商品細節頁面
完成後按左方的儲存按鈕,就可以把這個模型儲存下來了。它會自動幫你下載一個叫做 test.json 的檔案,記得重新命名成你想要的名稱,這邊我就叫做 WineWorld.json, 之後你的 JAVA Interface 會用這個命名。
寫測試程式
首先我們要建立一個 Maven 專案,並且加入 Graphwalker 的 Dependency,這邊官方文件就寫的很不清不楚了,好多該加的都沒寫。
- 建立 Maven 專案
這邊官網本來有給一串指令,意思是說可以直接建立一個包含 graphwalker 的 Maven 專案,但是我試了好幾次都失敗,所以我就直接用上面的指令建立一個空的專案,再加入 graphwalker 的 dependency。
設定
GroupId: tw.inthuang 這個可以自己設定
ArtifactId: WineWorld 這個也可以自己設定
Version: 4.3.2 這個請不要動,會影響到後面的 graphwalker 的版本
Package: WineWorld 這個也可以自己設定
- 在
pom.xml 加入 Graphwalker 的 Dependency
1
2
3
4
5
| <dependency>
<groupId>org.graphwalker</groupId>
<artifactId>graphwalker-cli</artifactId>
<version>${project_version}</version>
</dependency>
|
1
2
3
4
5
| <dependency>
<groupId>org.graphwalker</groupId>
<artifactId>graphwalker-java</artifactId>
<version>${project_version}</version>
</dependency>
|
- 重要 在
pom.xml 加入 Maven-graphwalker-plugin 的 Plugin
1
2
3
4
5
6
7
8
9
10
11
12
13
14
| <plugin>
<groupId>org.graphwalker</groupId>
<artifactId>maven-graphwalker-plugin</artifactId>
<version>${project_version}</version>
<executions>
<execution>
<id>generate-sources</id>
<phase>generate-sources</phase>
<goals>
<goal>generate-sources</goal>
</goals>
</execution>
</executions>
</plugin>
|
上面你可以看到不管是 Graphwalker 的 Dependency 還是 Maven-graphwalker-plugin 的 Plugin,都有一個 ${project_version},這個是我們在第一步驟設定的 Graphwalker 的版本號,如果你的版本號不是 4.3.2,請記得要改成你的版本號。
- 加入 Selenium 的 Dependency
1
2
3
4
5
| <dependency>
<groupId>org.seleniumhq.selenium</groupId>
<artifactId>selenium-java</artifactId>
<version>4.8.0</version>
</dependency>
|
- 把 Graphwalker 的 Model 檔案放到
src/main/resources/tw/inthuang/ 資料夾下
注意,resources 資料夾和 java 資料夾是平行的,不要放錯了,裡面還要包含 GroupId 的資料夾,你的 java 資料夾裡面有幾個資料夾才到自動生成的 App.java,這裡就要有幾個。
1
2
3
| src|-main-java-tw-inthuang-App.java
|
|-main-resources-tw-inthuang-WineWorld.json
|
- 建立 Graphwalker 的 Interface
使用 graphwalker:generate-sources 這個指令,會自動幫你建立 Graphwalker 的 Interface,這個 Interface 會自動幫你實作 Model 的所有 Vertex 和 Edge。
1
| mvn graphwalker:generate-sources
|
完成後你會看到多出一個 target 資料夾,裡面有很多東西,按照 targert -> generated-sources -> graphwalker -> tw -> inthuang -> WineWorld.java 這個路徑,就可以找到一個名為 WineWorld.java 的檔案 (這個檔案的名稱取決於你的 model file 名稱)。不要客氣點開來看看會發現有許多用你剛剛模型的 Vertex 和 Edge 命名的 Method,這些 Method 就是 Graphwalker 會自動幫你實作的。
- 實作 Test.java
打開你的 main 資料夾,最裡面應該有一個預設的 App.java,把它刪掉,然後建立一個名為 WineWorldTest.java 的檔案,裡面寫入以下程式碼。
1
2
3
4
5
6
7
8
9
10
11
12
13
14
15
16
17
18
19
20
21
22
23
24
25
26
27
28
29
30
31
32
33
34
35
36
37
38
39
40
41
42
43
44
45
46
47
48
49
50
51
52
53
54
55
56
57
58
59
60
61
62
63
64
65
66
67
68
69
70
71
72
73
74
75
76
77
78
79
80
81
82
83
84
85
86
87
88
89
90
91
92
| package WineWorld;
import java.time.Duration;
import org.graphwalker.core.machine.ExecutionContext;
import org.graphwalker.java.annotation.AfterExecution;
import org.graphwalker.java.annotation.BeforeExecution;
import org.graphwalker.java.annotation.GraphWalker;
import org.openqa.selenium.By;
import org.openqa.selenium.Keys;
import org.openqa.selenium.support.ui.ExpectedConditions;
import org.openqa.selenium.support.ui.WebDriverWait;
import org.openqa.selenium.firefox.FirefoxDriver;
import org.openqa.selenium.WebDriver;
import org.junit.Assert;
@GraphWalker()
public class WineWorldTest extends ExecutionContext implements WineWorld {
public static FirefoxDriver driver = new FirefoxDriver();
WebDriverWait wait = new WebDriverWait(driver, Duration.ofSeconds(10));
@BeforeExecution
public void setup() {
System.out.println("Setup happens here");
}
@AfterExecution
public void cleanup() {
System.out.println("Cleanup happens here");
driver.quit();
}
public void e_Init() {
System.out.println("Init");
};
public void e_ClickHomeLink() {
System.out.println("Click Home Link");
wait.until(ExpectedConditions.visibilityOfElementLocated(By.partialLinkText("WineWorld")));
wait.until(ExpectedConditions.invisibilityOfElementLocated(By.className("loading")));
driver.findElement(By.partialLinkText("WineWorld")).click();
};
public void e_ClickProductLink() {
System.out.println("Click Product Link");
wait.until(ExpectedConditions.visibilityOfElementLocated(By.linkText("商品列表")));
driver.findElement(By.linkText("商品列表")).click();
};
public void e_ClickProductCard() {
System.out.println("Click Product Card");
wait.until(ExpectedConditions.visibilityOfElementLocated(By.className("card")));
wait.until(ExpectedConditions.invisibilityOfElementLocated(By.className("loading")));
driver.findElement(By.className("img-overlay")).click();
};
public void e_GetUrl() {
System.out.println("Get URL");
driver.get("https://inthuang.tw/WineWorld/");
};
public void v_StartBorwser() {
System.out.println("Start Browser");
};
public void v_HomePage() {
System.out.println("Home Page");
wait.until(ExpectedConditions.titleContains("Wine World | 你要找的酒,都在這裡"));
Assert.assertEquals("Wine World | 你要找的酒,都在這裡", driver.getTitle());
};
public void v_ProductPage() {
System.out.println("Product Page");
wait.until(ExpectedConditions.urlContains("#/product"));
Assert.assertEquals("product", driver.getCurrentUrl().substring(32));
};
public void v_ProductDetailPage() {
System.out.println("Product Detail Page");
wait.until(ExpectedConditions.visibilityOfElementLocated(By.tagName("h3")));
Assert.assertEquals("商品介紹", driver.findElement(By.tagName("h3")).getText());
};
public void e_NewEdge() {
System.out.println("New Edge");
};
}
|
Source
總之就是實現剛剛 Graphwalker 產生的 Interface,然後實作裡面的 Method。
簡單介紹一下大致在做什麼:
1
2
| public static FirefoxDriver driver = new FirefoxDriver();
WebDriverWait wait = new WebDriverWait(driver, Duration.ofSeconds(10));
|
設定瀏覽器和等待時間
1
2
3
4
5
6
7
8
9
10
| @BeforeExecution
public void setup() {
System.out.println("Setup happens here");
}
@AfterExecution
public void cleanup() {
System.out.println("Cleanup happens here");
driver.quit();
}
|
設定測試開始前和結束後的動作,這邊我們只是印出一些訊息,然後關閉瀏覽器。
1
2
3
| public void e_Init() {
System.out.println("Init");
};
|
這個 Method 就是 Graphwalker 產生的 Interface 裡面的 e_Init,這個 Method 就是在測試開始前會執行的動作,我們只是印出一些提示訊息。
1
2
3
4
5
6
| public void e_ClickHomeLink() {
System.out.println("Click Home Link");
wait.until(ExpectedConditions.visibilityOfElementLocated(By.partialLinkText("WineWorld")));
wait.until(ExpectedConditions.invisibilityOfElementLocated(By.className("loading")));
driver.findElement(By.partialLinkText("WineWorld")).click();
};
|
等待網頁上的 WineWorld 這個 Link 出現,然後點擊它,不過因為我有些頁面有蓋一個 loading 的 overlay,所以又多一行等待他消失的程式。
1
2
3
4
5
| public void e_ClickProductLink() {
System.out.println("Click Product Link");
wait.until(ExpectedConditions.visibilityOfElementLocated(By.linkText("商品列表")));
driver.findElement(By.linkText("商品列表")).click();
};
|
等待網頁上的 商品列表 這個 Link 出現,然後點擊它。
1
2
3
4
5
6
| public void e_ClickProductCard() {
System.out.println("Click Product Card");
wait.until(ExpectedConditions.visibilityOfElementLocated(By.className("card")));
wait.until(ExpectedConditions.invisibilityOfElementLocated(By.className("loading")));
driver.findElement(By.className("img-overlay")).click();
};
|
等待網頁上的 card 這個 Class 出現,然後點擊它,同樣也是因為 overlay 的原因,我們又多一行等待他消失的程式。
1
2
3
4
| public void e_GetUrl() {
System.out.println("Get URL");
driver.get("https://inthuang.tw/WineWorld/");
};
|
對網址 https://inthuang.tw/WineWorld/ 發出 get 請求。
1
2
3
| public void v_StartBorwser() {
System.out.println("Start Browser");
};
|
啟動瀏覽器。
1
2
3
4
5
| public void v_HomePage() {
System.out.println("Home Page");
wait.until(ExpectedConditions.titleContains("Wine World | 你要找的酒,都在這裡"));
Assert.assertEquals("Wine World | 你要找的酒,都在這裡", driver.getTitle());
};
|
等待網頁的 title 包含 Wine World | 你要找的酒,都在這裡,然後驗證網頁的 title 是否等於 Wine World | 你要找的酒,都在這裡。
1
2
3
4
5
| public void v_ProductPage() {
System.out.println("Product Page");
wait.until(ExpectedConditions.urlContains("#/product"));
Assert.assertEquals("product", driver.getCurrentUrl().substring(32));
};
|
等待網頁的 url 包含 #/product,然後驗證網頁的 url 是否等於 #/product。
1
2
3
4
5
| public void v_ProductDetailPage() {
System.out.println("Product Detail Page");
wait.until(ExpectedConditions.visibilityOfElementLocated(By.tagName("h3")));
Assert.assertEquals("商品介紹", driver.findElement(By.tagName("h3")).getText());
};
|
等待網頁上的 h3 這個 Tag 出現,然後驗證網頁上的 h3 這個 Tag 的文字是否等於 商品介紹。
1
2
3
| public void e_NewEdge() {
System.out.println("New Edge");
};
|
這個東西其實我不知道是哪來的,但是 Graphwalker 產生的 Interface 裡面有這個東西,所以我也不得不實作它,猜測可能是當初建立的模型有多按到一條 Edge 導致的,但我沒看到他在哪,真尷尬,總之你的模型要是沒問題就別管他。
執行測試
接下來就是執行測試了,我們只要在終端機輸入以下指令就可以了:
1
| mvn clean graphwalker:test
|
clean 是清除之前的編譯結果,graphwalker:test 是執行 Graphwalker 的測試。
執行完後,就會看到噴出一堆運行結果,可以看到 graphwalker 的 logo 出現在畫面上,還記得當初看到有多感動,試了好多次才看見他。
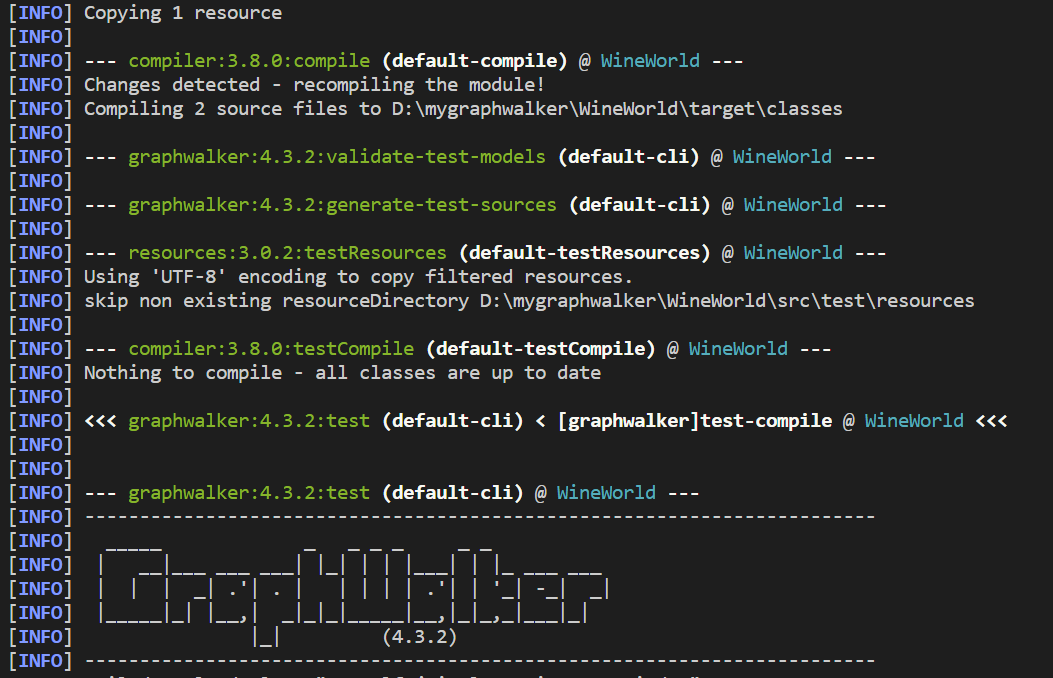
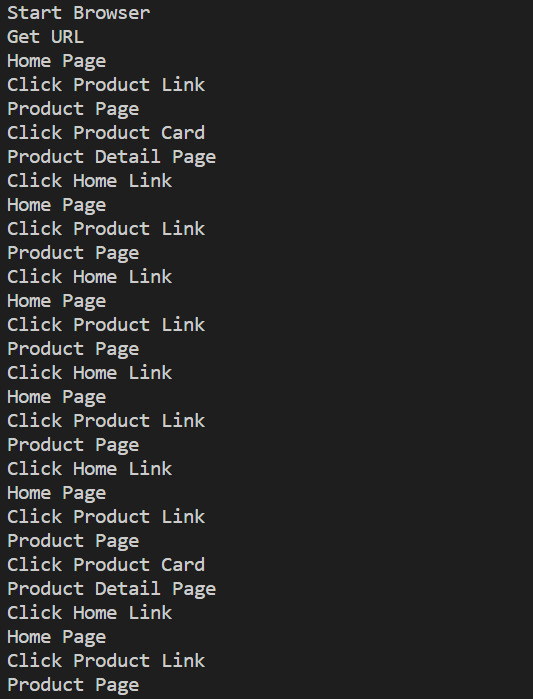
然後就是一些測試過程中會印出的訊息
最後會看到執行結果以及 Build Success
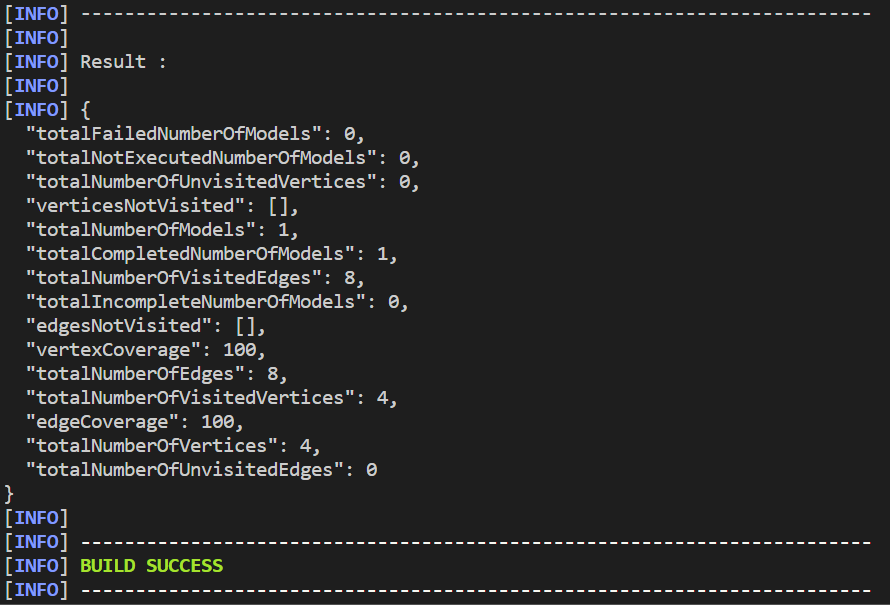
大功告成!
Debug
這邊教你怎麼看測試後的報告,執行 mvn clean graphwalker:test 後,會在專案的根目錄下產生一個 target 的資料夾,裡面會有一個 graphwalker-reports 的資料夾,資料夾裡有一個名字很長的 xml,這就是我們要的報告,打開後拉到最底下會看見錯誤訊息以及錯誤的行數。
結論
這篇文章分享了這兩天踩雷的結果,畢竟官方的文檔給了好多方法但是前後說詞不一阿… 像是根本沒提到 model 可以是 json 也可以是 graphml,又或者是沒說要加入 graphwalker 的 plugin,這些都是我花了很多時間才找到的,希望這篇文章能幫助到大家,如果有任何問題歡迎敲我 DC 或 推特討論。


